So I am crazy. I am planning on doing my first (and maybe last, but I know myself it won’t be) 12 hour time trial in April. “Why?,” asked one friend. Because it exists to be conquered.
My bike is a bit of a Frankenstein as 1) I don’t have a multi-million dollar sponsor and 2) my personal theory that “function is beauty” and always comes before aesthetics.
Not saying the steed looks bad, just going for affordable speed.

And an aero road bike set-up properly can be almost as fast as a truly optimized TT bike. Here is the data.
So What is the Ultra Bike Set-Up and Why Did I Pick It?
Getting geared up and ready. I have a Cannondale SuperSix that I love. I bought it used from a friend. He bought a new bike and then I think regretted the sale. Too late!
It is slowly getting tweaked out for time trialing. Here are the tweaks that have happened over several years.
Stages Power Meter.
Bought used on Ebay for $399.
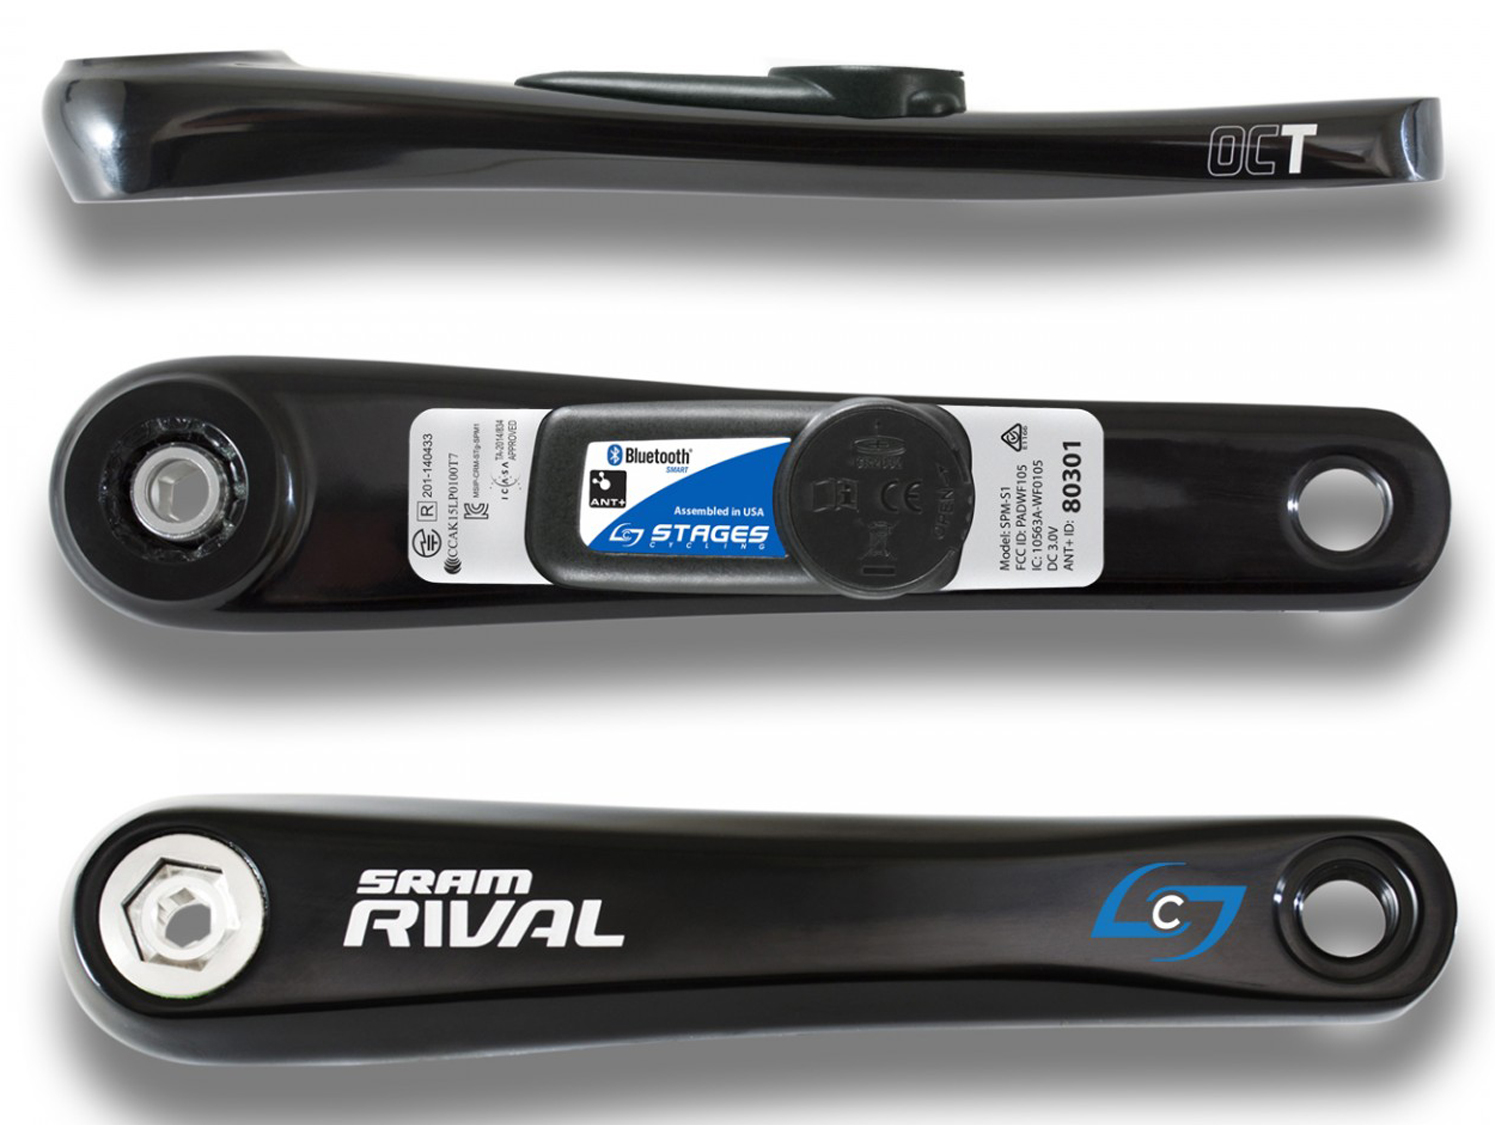
A power meter uses tension to measure how much force I am putting against the pedals. Unlike a heart rate monitor, its measure is absolute (and unforgiving).
On a day I am riding with a tailwind and pumping out “incredible speeds” (for me) with a low heart rate, it keeps me honest. It tells me, “You are only pushing out 197 watts, Jordan, don’t get cocky.” It does help me pace myself and not blow up.
Redshift Aero Kit.
Bought new for $399. Birthday money.
Your number one enemy in cycling time trials is air. Pesky little, invisible air. But when you are riding into a headwind of 5 mph at 20 mph you now are riding against a 25 mph wind. Getting low and out of the wind is vital.
I could have bought an all new time trial bike, but Dave Ramsey and the fam might have had something to say about that (I have teenagers car insurance premiums to pay). Also, in case I get really crazy and start doing 24 hour TT or 500 miles rides, or yes RAAM, I want to be able to change positions between aero and road occasionally.
The Redshift system provides me the ability to ride in an aero-tuck into headwinds and slides the seat forward in this position to ensure all my leg angles are correct to generate the right amount of power. But when I get tired in a tailwind, need to climb a hill, etc. I can simply grab the seat and quickly lock it back into a traditional road position on the fly (while riding, even though they have to legally warn you not to do this, everyone does.)
Cobb Randee Saddle.
Bought $189. During Craig Fulk fitting.
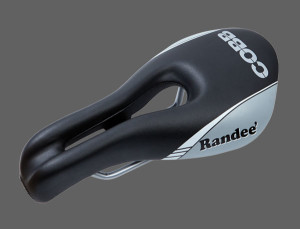
My number one issue on super long rides is butt pain (there is honesty for you). I have a traditional nice Fizik road racing saddle but it isn’t cutting it for longer and longer rides. I kept getting sharp pain around my right sit bone.
I bought the Adamo Prologue (see below), but after multiple rides, it was slightly too wide for me at the front. I also did a high-end full fit with Craig Fulk at Dynamic Bike Fit. He has the Gebio systems where he pust this skin thin cover on your saddle and it actually measures pressure and center of gravity as you spin and spits it out like a weather radar. Red is bad. Blue is good. It offers a dynamic view.
The Adamo had a consistent red spot on right sitz bone that never unloaded. My center of gravity was also not ideal. Front left. We tried about five other saddles. The Cobb Randee won. No hotspots and much better center of gravity. Still adjusting but loving it so far.
IMS Adamo Prologue Saddle.
Bought Used $20. Consignment sale.
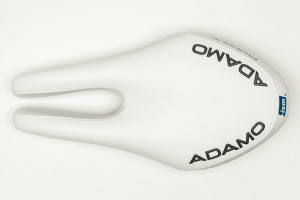
My number one issue on long rides is butt pain (there is honesty for you). I have a traditional nice Fizik road racing saddle but it isn’t cutting it for longer and longer rides. I kept getting sharp pain around my right sit bone.
I picked up an Adamo Prologue saddle for $20 (normally $189) at a consignment sell-off of an LBS that went bankrupt.
Boom! Butt heaven. On a recent 8 hour training ride, I got sore but no shooting pains and no saddle sores. My rear should break into the seat more before the race, as well. This seat is very non-traditional looking but works fabulously.
Wheel Selection for the Ultra
Wheel Weight and the Ultra Course
My first ultra is on a pancake flat course near Katy, TX.
In fact. to determine course difficulty I have invented a system to measure entire courses or 10 mile sections of a course as Jvals (Jordan values, cute eh?). I take the gross feet of vertical climb over the course and divide it by miles of course (I can do this section by section, too). I don’t count vertical descent feet anywhere in the equation. (Example 1700 ft rise divided by 50 miles = 34 Jval.)
This gives me a Jval number. The best (aka “worst”) climb I’ve ever done is a Category 2 up to McDonald Observatory in Alpine, TX. This had a Jval of 215. Most rolling hill rides around Fort Worth are in the Jval 40-50 range.
The Bessie’s Creek Challenge has a Jval of 9. Yes N-I-N-E. Flat and fast! I thought the Hotter Than Hell 100 was flat and it was Jval of 17.
I am a big guy at 6’4″ so this course fits my style of Jan Ulrich riding (slightly lower cadence at 87rpm when self-selected, slightly bigger gears). Since there is minimal climbing on most TT/ultra courses, aero is more important than weight.
I need fast wheels so here is what I have settled on after experimentation.
Rear Wheel Setup
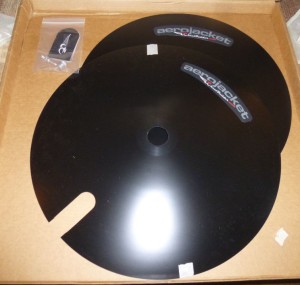
$275 Total. $180 Used Ksyrium Wheel on Ebay/$90 New Aerojacket Disk Cover.
I bought a used Mavic Kyrsium Elite rear wheel for dirt cheap on Ebay $175. I am putting aerodisk jackets made by wheelbuilder.com on the wheel to give me a complete disk rear setup for $275 instead of the $1000+ for a full disk set-up. Their data is solid.
Running a Continental 4000s tire (tyre for you Brits). Going with a 25 width on rear to soften the ride a bit (and this width has less rolling resistance than a 21 or 23.)
This rear wheel set will give the low drag of wheel costing 5x as much at a less than my current training wheel weight as the Ksyrium’s are lightweight. (Not that is training wheel, not the things sticking out the side of little kids’ bikes, though I may need them late in the race.)
Font Wheel Setup
$424 Total. FloCyling.com Flo60.
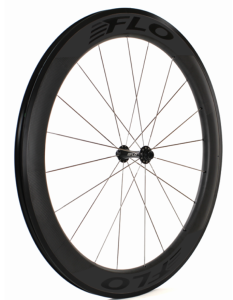
For the front, I spent Christmas money and purchased a FLO60 deep dish. These wheels get great reviews and are affordable. The Flo guys are just cool with some of the best customer support in the biking biz.
Note: Rule of thumb is never run a deeper wheel on the front than the back or your front wheel can turn into a sail in crosswinds and you’ll “exit stage…ditch.” The 60 should allow me to take some heavier crosswinds and not give up much speed.
Catlike AeroShell Helmet
$40. Australian Ebay
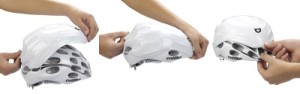
I have a Catlike Mixino helmet which I bought several years ago. I live in Texas and summer rides are frequently at 100ºF+. Turns out Catlike makes an aeroshell to turn this ventilated monster into a more aero-helmet for CHEAP. Since my head position will change during an ultra there is no need for the “tail of death” type aero helmet. This will work fine.
Skinsuit?
$40 Ebay.
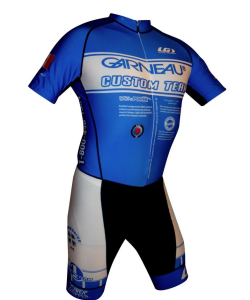
I am still debating this one.
“Loose kits sink ships.”
Perhaps the cheapest way to get free speed is a super tight fitting kit. My bibs of choice are the Pearl Izumi Elite or Pro level because the pad (aka chamois) works for me for extended times in the saddle. I have tried other brands and the cut isn’t right.
So the dilemma is to:
- buy a $150+ Pearl Izumi skinsuit (last resort and I have to ride in BMC team labels, weird for me).
- try this Garneau Skinsuit I found used for $37 I found on Ebay
- to wear bibs I know work the tightest jersey i have.
Going to try #2 on long training ride then #3. If I keep at it, someday I’ll reward myself with #1.
So total Road Steed to Time Trial Steed Costs
(and I can shift it back to full road bike in <5 minutes).
- $399 Stages Powermeter
- $319 Redshift Aero System
- $675 Wheel Combinations
- $40 Aero Helmet
- $20 Adamo Prologue Saddle
- $40 Skinsuit
- =$1,493 TOTAL UPGRADE COSTS
- +$1200 Used Cannondale Supersix I already have.
- =$2,693 TOTAL JORDAN AERO RIDE
New Time Trial Bike with these additional features?
- $3,499 Cannondale Slice RS
- $800 Stages Power Meter
- $1,000 Full Carbon Disk Rear Wheel
- $575 Zipp Front Wheel Carbon 60
- $150 Pearl Izumi Skinsuit
- $189 Adamo Prologue Saddle
- $209 Catlike Cronos Aero Helmet
- = $6,422 TOTAL NEW AERO RIDE
In Conclusion
So I am getting very close to the same aerodynamic drag coefficients for a built out Time Trial bike for 40% of the cost. If you consider I already owned the SuperSix, that goes up to a dramatic spend of only 23% of the cost of a new ride.
And I can go back to a traditional road bike setting for group rides in <5 minutes. All I have to do is:
- Switch out wheels.
- Pop off quick release aerobars
- Make sure the Redshift seat stem is in back position
- Heck, if I really want to revert, I can drop the standard carbon saddle post with Fizik saddle back in whose height is marked with a paint pen.
You can get a fast yet affordable bike setup for ultras if you are willing to do the savings work, shop Ebay, looks for deals and be patient.
Stay tuned to find out how this all turns out. I’m sure they’ll be some semi-humorous accounts coming soon.
I found that really informative Jordan, thanks for sharing your ideas. I am in a similar position in that I have a road bike I love but would like to get into time trials. Biking is a recent hobby and I have realised that I would prefer to just train for short efforts (10 mile/25 mile). Like I said I like my road bike and I have spent a fair amount of money on it from new, I wondered what you would suggest as the next thing for me to ‘upgrade’ for a faster bike?
I have just bought some clip on Tri/aero bars and I am getting used to these. I really like your wheel set up and see this seems quite common with the solid back wheel on TT bikes. Is that the next step do you think-just thinking of ways to make my bike fit in (and go faster!). Any suggestions much appreciated. Thanks
Your next step is the Aero-shift seatpost by Red Shift https://www.redshiftsports.com/dual-position-seatpost/. If you just slap on aero bars to your roadbike your body isn’t in the right position to generate power. (The other option would be to by a forward shifted seatpost with a different saddle and switch it out when you want to TT, but that is a pain.) Generating power with proper fit is THE most important thing you can do. Get fit in BOTH positions with aero-shift in back and forward.
Next is a super tight fitting jersey. Great bang for the buck.
Next is an aero helmet. Good bang for the buck. I am using the Ballista currently.
Then finally deal with the wheels. They can cost you a great deal for the real advantages gained. I like the Flo wheels for price and disk covers for rear wheels rather than buying an expensive disk.
Nice! Don’t forget to shave your legs! (and arms) https://youtu.be/DZnrE17Jg3I
Always, Jesse. High and tight on the legs.